Tag: traditional british recipes

  • Traditional British Sausage Rolls: An Easy Recipe for American Kitchens

    Traditional British Sausage Rolls: An Easy Recipe for American Kitchens

    Few things disappear from a British party table quite as quickly as a plate of warm sausage rolls.

    Flaky, golden pastry wrapped around a savoury sausage filling, they’re one of those wonderfully simple British foods that work for almost any occasion — parties, picnics, lunchboxes, afternoon snacks, or simply something warm to eat when you fancy a little taste of home.

    And if you’re making British sausage rolls in America, there’s good news: you don’t need to make your own puff pastry or hunt down a long list of specialty ingredients.

    Store-bought puff pastry works beautifully, and I’ll show you how to make a classic sausage filling using ingredients that are easy to find in an American grocery store. As always, you’ll get US measurements alongside metric weights.

    The biggest difference American cooks may encounter is the sausage itself. British sausage meat isn’t quite the same as many strongly seasoned American breakfast sausages, so we’ll talk about what to look for — and how to get that familiar British-style flavour.

    Brit & Skillet Tip: Keep your puff pastry cold until you’re ready to assemble the sausage rolls. Cold pastry hitting a hot oven is one of the secrets to getting those beautifully crisp, flaky layers.

    What Are British Sausage Rolls?

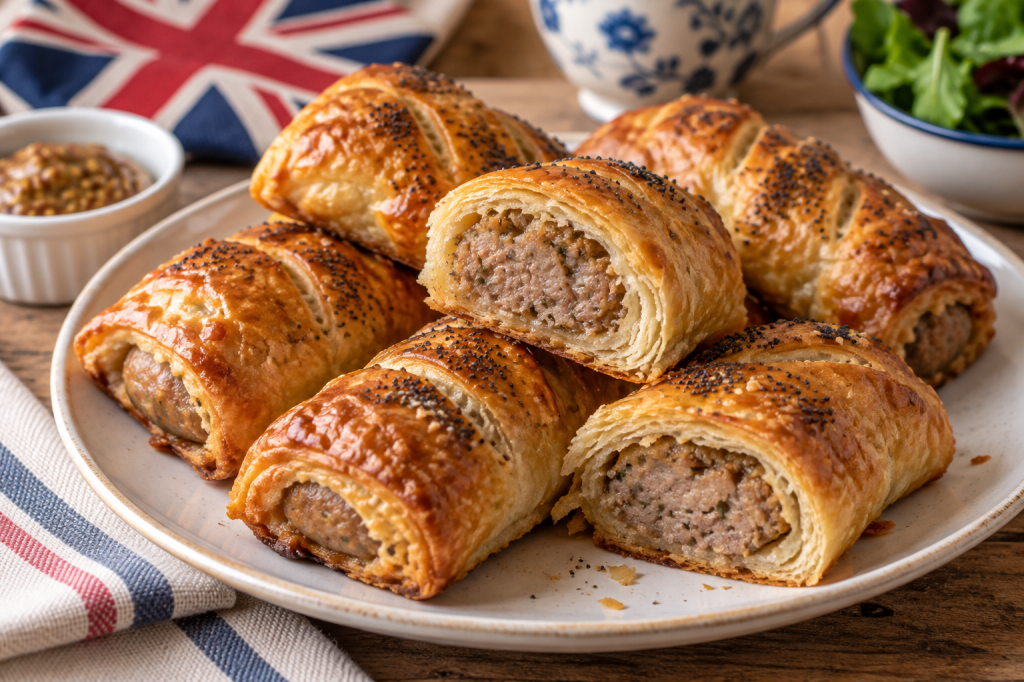
    A traditional British sausage roll is made by wrapping seasoned sausage meat in puff pastry, brushing the pastry with egg, and baking until beautifully puffed and golden.

    They’re sold everywhere from bakeries to supermarkets in Britain and can be served warm or cold. You’ll find tiny versions on party tables, larger ones for lunch, and plenty of homemade versions with their own little twists.

    Despite the name, there’s no bread roll involved. The “roll” is simply the pastry rolled around the sausage filling.

    What Sausage Should I Use in America?

    This is probably the most important question when recreating British sausage rolls in an American kitchen.

    British sausage meat tends to have a fairly mild savoury flavour, often seasoned with herbs such as sage, along with salt and pepper. Some American breakfast sausages can be much sweeter or more heavily seasoned, which can change the flavour considerably.

    For a more traditional result, look for plain ground pork and season it yourself. This gives you much more control over the flavour and is the approach we’ll use in this recipe.

    If you’d rather use prepared sausage, choose a mild pork sausage without strong flavours such as maple, hot spices, Italian seasoning, or lots of fennel.

    And if you happen to have access to proper British-style sausages, you can simply remove the meat from the casings and use that as your filling.

    Do I Need to Make Puff Pastry?

    Absolutely not.

    Homemade puff pastry is wonderful, but sausage rolls are also exactly the sort of recipe where good-quality store-bought puff pastry makes life considerably easier.

    In American supermarkets, puff pastry is usually sold frozen. Thaw it according to the package directions, but keep it chilled until you’re ready to assemble the sausage rolls.

    The pastry should be flexible enough to unfold or roll without cracking, but still feel cold to the touch.

    Brit & Skillet Tip: If your kitchen is warm and the pastry starts becoming soft or sticky while you’re assembling the rolls, pop it back into the refrigerator for 10–15 minutes. You’ll get much better puff from cold pastry.

    Traditional British Sausage Rolls Recipe

    Prep Time: 25 minutes
    Chill Time: 15 minutes
    Bake Time: 25–30 minutes
    Yield: About 12 sausage rolls

    Ingredients

    For the Sausage Filling

    • 1 lb (450g) ground pork
    • ½ cup (50g) plain breadcrumbs
    • 1 small onion, very finely chopped or grated
    • 1 teaspoon dried sage
    • ½ teaspoon dried thyme
    • ¾ teaspoon salt
    • ½ teaspoon black pepper
    • ¼ teaspoon ground nutmeg
    • 2 tablespoons (30ml) cold water

    For the Pastry

    • 1 package frozen puff pastry, about 17 oz (490g), thawed according to package directions but kept cold
    • 1 large egg
    • 1 tablespoon water, for the egg wash

    Optional for the Top

    • Sesame seeds or poppy seeds

    Brit & Skillet Tip: Grating the onion rather than chopping it gives you very small pieces that disappear into the sausage filling as it cooks. You get the flavour without large pieces of onion breaking up the texture of the filling.

    Perfect. ✅ Now we’ll assemble and bake them.

    Step-by-Step Instructions

    1. Prepare the Sausage Filling

    Place the ground pork, breadcrumbs, grated onion, sage, thyme, salt, pepper, nutmeg and cold water in a large bowl.

    Using clean hands or a fork, gently mix everything together until the seasonings are evenly distributed.

    Try not to overwork the pork, as this can make the filling firmer than you want.

    2. Prepare the Puff Pastry

    Line a large baking sheet with parchment paper.

    Unfold or gently roll the chilled puff pastry on a lightly floured surface.

    Depending on the shape and number of pastry sheets in your package, divide the pastry into long rectangles approximately 4–5 inches (10–13cm) wide.

    The exact dimensions aren’t critical — you simply need enough pastry to wrap comfortably around the sausage filling with a small overlap.

    3. Add the Sausage Filling

    Divide the sausage mixture evenly between the pastry rectangles.

    Shape each portion into a long sausage about 1–1½ inches (2.5–4cm) thick and place it lengthwise near one edge of the pastry.

    4. Roll and Seal

    Beat the egg with 1 tablespoon of water to make an egg wash.

    Brush a little egg wash along the opposite long edge of the pastry.

    Roll the pastry snugly around the sausage filling so the edges overlap, then place the roll seam-side down.

    Repeat with the remaining pastry and filling.

    5. Cut and Chill

    Using a sharp knife, cut the long rolls into pieces approximately 2 inches (5cm) wide. You should end up with about 12 sausage rolls.

    Arrange them on the prepared baking sheet, leaving a little space between each one.

    Brush the tops with egg wash and, if you like, sprinkle with sesame or poppy seeds.

    Using the tip of a sharp knife, make 2 or 3 small slashes across the top of each sausage roll.

    Refrigerate the assembled sausage rolls for about 15 minutes while the oven preheats.

    6. Bake

    Preheat the oven to 400°F (200°C).

    Bake the sausage rolls for 25–30 minutes, or until the pastry is deeply golden and puffed and the pork filling is completely cooked.

    For food safety, the centre of the sausage filling should reach 160°F (71°C) when checked with an instant-read thermometer.

    Allow the sausage rolls to cool on the baking sheet for about 5 minutes before serving.

    Brit & Skillet Tip: Don’t pull your sausage rolls from the oven when the pastry is merely pale gold. Giving puff pastry enough time to become properly golden helps create those crisp, flaky layers that make a good sausage roll so irresistible.

    How to Serve British Sausage Rolls

    British sausage rolls are delicious either warm or at room temperature, which is one reason they’re such a favourite for parties, picnics and packed lunches.

    Serve them on their own or with a little mustard, ketchup, chutney or brown sauce on the side.

    For something more substantial, pair warm sausage rolls with a simple salad, soup, or a few other British favourites for an easy lunch.

    Can You Make Sausage Rolls Ahead of Time?

    Yes. You can assemble the sausage rolls, place them on the prepared baking sheet, cover them well and refrigerate them for up to 24 hours before baking.

    Keep them cold until you’re ready to put them into the oven, then brush with egg wash if you haven’t already done so and bake as directed.

    How to Store Leftover Sausage Rolls

    Because the filling contains cooked pork, leftover sausage rolls should be refrigerated.

    Allow them to cool, then transfer them to an airtight container and refrigerate for up to 3 days.

    To reheat, place them in a 350°F (175°C) oven for about 10–15 minutes, or until hot throughout and the pastry has crisped again.

    The microwave will work in a hurry, but the pastry will be much softer.

    Can You Freeze Sausage Rolls?

    Absolutely. Sausage rolls are particularly handy to have in the freezer.

    You can freeze them after baking by allowing them to cool completely and storing them in a freezer-safe container for up to 3 months.

    Thaw overnight in the refrigerator and reheat in the oven until piping hot throughout.

    You can also freeze assembled unbaked sausage rolls. Freeze them on a baking sheet until firm, then transfer them to a freezer-safe container or bag.

    Bake from frozen, allowing a little additional baking time and checking that the pork filling reaches 160°F (71°C) in the centre before serving.

    Why Is My Puff Pastry Soggy?

    Make sure your pastry and sausage filling are kept cold before baking and that the oven is fully preheated.

    Placing the sausage rolls seam-side down also helps keep them securely closed while they bake.

    If your filling is particularly wet, excess moisture can soften the pastry. That’s another reason not to add too much liquid to the sausage mixture.

    Why Did My Sausage Rolls Split Open?

    A little movement in the pastry is normal as it puffs, but sausage rolls that completely unroll may not have been sealed firmly enough.

    Brush the pastry edge lightly with egg wash, overlap the edges securely and bake the rolls with the seam underneath.

    And don’t forget those little slashes across the top — they give steam somewhere to escape as the filling cooks.

    Brit & Skillet Tip: Sausage rolls are at their best reheated in the oven rather than the microwave. A few extra minutes is worth it when the reward is crisp, flaky pastry.

    Bring a British Favourite to Your American Kitchen

    There’s something wonderfully satisfying about pulling a tray of homemade sausage rolls from the oven — especially when the pastry is crisp and golden and you can smell that savoury sausage filling underneath.

    They may be a familiar sight in British bakeries and supermarkets, but making them at home is surprisingly straightforward. Store-bought puff pastry does most of the hard work, and seasoning plain ground pork yourself means you can create that classic British-style filling with ingredients from an American grocery store.

    Serve them warm from the oven, tuck them into a picnic, or make a batch for your next party. And if a few find their way into the freezer for later, even better.

    If you enjoyed making these, try our Traditional Yorkshire Puddings for another savoury British classic, or explore more of our traditional British recipes for plenty of ideas to bring a little taste of Britain to your American kitchen.
  • Traditional British Lemon Drizzle Cake: An Easy Recipe for American Bakers

    Traditional British Lemon Drizzle Cake: An Easy Recipe for American Bakers

    There are few cakes quite as cheerful as a proper lemon drizzle cake. Soft, buttery sponge, plenty of fresh lemon flavour, and that sweet, sharp drizzle soaking into the top while the cake is still warm — it’s simple British baking at its best.

    If you’re making lemon drizzle cake in an American kitchen, you may notice that British recipes often call for ingredients such as caster sugar and self-raising flour, or give their loaf tin size in centimetres. None of that needs to make things complicated.

    In this recipe, we’ll use ingredients that are easy to find in an American supermarket, with US measurements alongside metric weights and a standard American loaf pan.

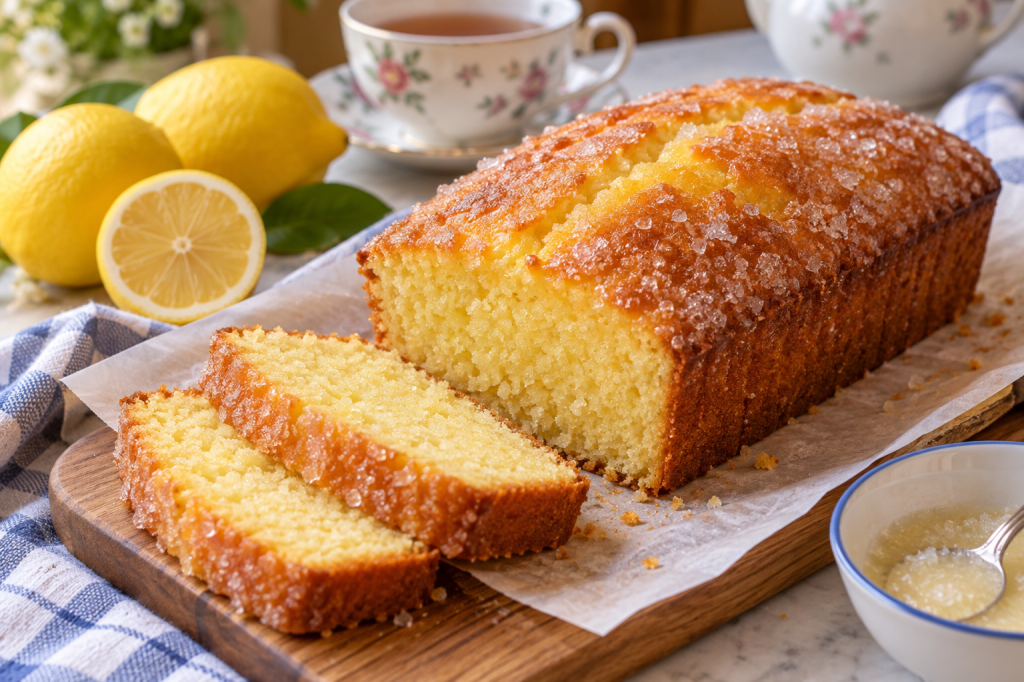
    The result is a moist lemon cake with a slightly crisp, sugary top and plenty of bright citrus flavour. It’s lovely with a cup of tea, easy enough for an everyday bake, and doesn’t need icing or elaborate decoration to make it special.

    Brit & Skillet Tip: Don’t wait for the cake to cool before adding the drizzle. Pricking the warm cake and spooning the lemon mixture over the top allows some of that sharp, sugary syrup to soak into the sponge while leaving a lovely finish on top.

    What Is British Lemon Drizzle Cake?

    Lemon drizzle cake is a simple British sponge cake flavoured with fresh lemon zest and finished with a mixture of lemon juice and sugar while the cake is still warm.

    The drizzle is what makes it distinctive. Rather than covering the cake with a thick layer of frosting, you prick the freshly baked sponge and spoon the lemon-and-sugar mixture over the top. Some of it soaks into the cake, while some remains on the surface to create that characteristic sweet, slightly crunchy lemon topping.

    It’s usually baked as a loaf, sliced generously, and served just as it is — preferably with a cup of tea nearby.

    British Ingredients in an American Kitchen

    A British lemon drizzle recipe can look slightly different from an American cake recipe, so here are a few translations that make shopping easier.

    Caster sugar: This is a fine white sugar commonly used in British baking. American superfine sugar is the closest equivalent, but regular granulated sugar can also be used for this recipe.

    Self-raising flour: British recipes frequently use self-raising flour in sponge cakes. In this recipe, we’ll use American all-purpose flour with baking powder added separately, so there’s no need to buy a special flour.

    Lemons: Fresh lemons are important here because we’ll use both the zest in the sponge and the juice for the drizzle.

    Brit & Skillet Tip: When zesting your lemons, remove only the yellow outer layer. The white pith underneath is bitter, so a light touch with your zester is all you need.

    Traditional British Lemon Drizzle Cake Recipe

    Prep Time: 20 minutes
    Bake Time: 45–55 minutes
    Yield: About 10 slices
    Pan: 9 x 5-inch (23 x 13cm) loaf pan

    Ingredients

    For the Lemon Cake

    • 1¾ cups (210g) all-purpose flour
    • 2 teaspoons baking powder
    • ¼ teaspoon salt
    • ¾ cup (170g) unsalted butter, softened
    • 1 cup (200g) granulated or caster sugar
    • 3 large eggs, at room temperature
    • Finely grated zest of 2 lemons
    • ¼ cup (60ml) whole milk

    For the Lemon Drizzle

    • ⅓ cup (65g) granulated sugar
    • ¼ cup (60ml) freshly squeezed lemon juice

    Brit & Skillet Tip: Zest your lemons before you juice them. It sounds obvious until you’re standing in the kitchen trying to zest two floppy lemon halves!

    Step-by-Step Instructions

    1. Prepare the Pan and Oven

    Preheat the oven to 350°F (175°C).

    Lightly grease a 9 x 5-inch (23 x 13cm) loaf pan and line it with parchment paper, leaving a little overhang along the longer sides so the cake is easier to lift out once cooled.

    2. Mix the Dry Ingredients

    In a medium bowl, whisk together the all-purpose flour, baking powder and salt. Set aside.

    3. Cream the Butter and Sugar

    In a large mixing bowl, beat the softened butter and sugar together until pale, light and fluffy.

    Add the eggs one at a time, beating well after each addition.

    Mix in the finely grated lemon zest.

    4. Finish the Batter

    Add about half of the flour mixture and gently mix until just combined.

    Pour in the milk, then add the remaining flour mixture.

    Mix gently until you no longer see streaks of dry flour. Avoid overmixing once the flour has been added.

    5. Bake

    Spoon the batter into the prepared loaf pan and gently smooth the top.

    Bake for 45–55 minutes, or until the cake is golden and a toothpick inserted into the centre comes out clean or with just a few moist crumbs.

    If the top is browning more quickly than the centre is baking, loosely cover the cake with foil during the final part of the baking time.

    Leave the cake in its pan while you prepare the lemon drizzle.

    Brit & Skillet Tip: Start checking the cake at around 45 minutes. Loaf pans and ovens can vary, so use the appearance and toothpick test rather than relying on the clock alone.

    Make the Lemon Drizzle

    While the cake is still warm, combine the granulated sugar and freshly squeezed lemon juice in a small bowl.

    Stir briefly to combine. The sugar doesn’t need to dissolve completely — those remaining sugar crystals help create the slightly crisp topping that makes lemon drizzle cake so good.

    Using a skewer or toothpick, prick small holes all over the top of the warm cake.

    Slowly spoon the lemon drizzle over the cake, spreading it across the surface so it can work its way into the little holes and around the edges.

    Leave the cake in the pan until it has cooled completely.

    Once cool, carefully lift it from the pan using the parchment paper and remove the paper before slicing.

    How to Serve Lemon Drizzle Cake

    Lemon drizzle cake really doesn’t need much dressing up. Slice it generously and serve it just as it is with tea or coffee.

    The combination of buttery sponge, fresh lemon and that slightly crunchy sugar topping is the whole point — no frosting required.

    If you’re putting together an afternoon spread, it would also sit beautifully alongside Classic British Scones or Traditional British Jam Tarts.

    Brit & Skillet Tip: Give the drizzle a little time to settle before cutting the cake. It’s difficult to resist while it’s warm, but allowing it to cool completely gives the topping time to set and makes the loaf much easier to slice neatly.

    How to Store Lemon Drizzle Cake

    Once completely cool, store your lemon drizzle cake in an airtight container at room temperature for up to 3 days.

    There’s no need to refrigerate it. In fact, keeping the cake at room temperature helps the sponge stay soft and tender.

    Can You Freeze Lemon Drizzle Cake?

    Yes. Lemon drizzle cake freezes very well.

    Allow the cake to cool completely, then wrap either the whole loaf or individual slices securely and place them in a freezer-safe container or bag.

    Freeze for up to 3 months.

    Thaw at room temperature before serving. Freezing individual slices is particularly handy when you want something sweet with an afternoon cup of tea without defrosting the entire loaf.

    Why Did My Lemon Drizzle Cake Sink?

    A slight dip in the centre isn’t necessarily a disaster, but a cake that sinks significantly may have been underbaked.

    Opening the oven door too early can also cause the centre to fall before the structure of the cake has had time to set.

    Wait until the cake is close to the end of its baking time before checking it.

    Why Is My Lemon Drizzle Cake Dry?

    The most common culprit is simply baking it for too long.

    Start checking your cake at around 45 minutes and remove it once a toothpick inserted into the centre comes out clean or with a few moist crumbs.

    Measuring flour carefully also matters. If you’re using cups rather than a kitchen scale, spoon the flour lightly into the measuring cup and level it rather than packing it down.

    Why Didn’t the Lemon Drizzle Soak Into My Cake?

    For the best result, add the drizzle while the cake is still warm and still in the pan.

    Pricking plenty of small holes across the surface gives the lemon mixture somewhere to go. Spoon it over gradually rather than pouring everything into one spot.

    Don’t worry if some sugar remains visible on top — that’s exactly what helps create the traditional slightly crunchy lemon finish.

    Brit & Skillet Tip: A kitchen scale is one of the easiest ways to get consistent results when making British recipes. If you have one, use the metric weights in the recipe — particularly for the flour, butter and sugar.

    A Little Taste of Britain in Your American Kitchen

    There’s a reason lemon drizzle cake has remained such a favourite in British kitchens. It uses simple ingredients, doesn’t need any fancy decoration, and still manages to feel like a proper treat.

    That combination of soft lemon sponge and sharp, sugary drizzle is especially lovely with a cup of tea — and it’s an easy recipe to come back to whenever you fancy doing a little British baking.

    Once you’ve made it a few times, you can also adjust the lemon flavour to suit your taste. Add a little extra zest if you like things particularly citrusy, or keep it simple and let that classic lemon-and-sugar topping do all the work.

    If you enjoyed this recipe, explore more of our traditional British recipes for plenty more bakes and dishes you can recreate in your American kitchen.


  • Traditional Yorkshire Puddings: An Easy British Recipe for American Kitchens

    Traditional Yorkshire Puddings: An Easy British Recipe for American Kitchens

    If you grew up in Britain, a Sunday roast without Yorkshire puddings can feel as though something rather important is missing from the plate.

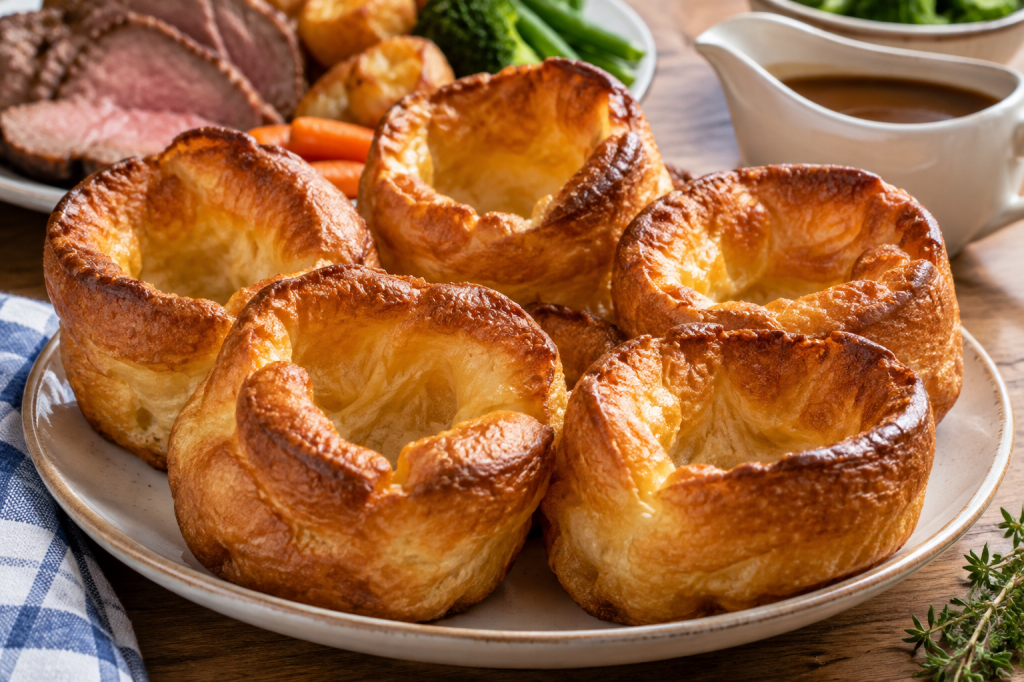
    Crisp and deeply golden around the edges, soft and slightly chewy inside, Yorkshire puddings are made from a surprisingly simple batter of flour, eggs and milk. The magic happens when that batter hits a very hot pan with hot fat, causing the puddings to puff dramatically in the oven.

    And despite the name, these aren’t puddings in the way most Americans use the word. Yorkshire puddings are a savoury side dish, traditionally served as part of a roast dinner and particularly associated with roast beef and gravy.

    The good news for American cooks is that you don’t need a special Yorkshire pudding tin to make them. A standard 12-cup muffin tin works beautifully, and I’ll give you both US and metric measurements throughout.

    Brit & Skillet Tip: The two things Yorkshire puddings love most are heat and patience. Get the pan and fat properly hot before adding the batter — and once they’re in the oven, resist opening that door to have a peek!

    What Are Yorkshire Puddings?

    Yorkshire puddings are a traditional British side dish made from a simple batter of eggs, flour and milk. They’re baked in a very hot tin with a little hot fat, which causes the batter to rise dramatically and form those wonderfully crisp, golden edges and softer centres.

    If you’re American, think of them as a close relative of a popover rather than anything resembling a dessert pudding.

    Yorkshire puddings are most famously served with a traditional Sunday roast, where those crisp little hollows are particularly good at catching plenty of gravy.

    Do I Need a Yorkshire Pudding Tin?

    Not at all.

    Traditional Yorkshire pudding tins tend to have shallower, wider wells than an American muffin tin, but a standard 12-cup muffin tin is a very practical substitute for an American kitchen.

    Your Yorkshire puddings may come out a little taller and narrower than ones baked in a traditional tin, but they’ll still have the crisp exterior, puffed shape and hollow centre we’re looking for.

    Brit & Skillet Tip: If you’ve seen photographs of Yorkshire puddings that look different from yours, the tin may be the reason. The shape can vary quite a bit depending on whether they’re baked in a traditional shallow Yorkshire pudding tin or a deeper American muffin tin.

    Traditional Yorkshire Puddings Recipe

    Prep Time: 10 minutes
    Batter Resting Time: 30 minutes
    Bake Time: 20–25 minutes
    Yield: About 12 Yorkshire puddings
    Pan: Standard 12-cup muffin tin

    Ingredients

    • 1 cup (120g) all-purpose flour
    • ½ teaspoon salt
    • 4 large eggs
    • 1 cup (240ml) whole milk
    • 2–3 tablespoons neutral cooking oil or beef drippings, for the tin

    What Kind of Fat Should I Use?

    Beef drippings give Yorkshire puddings a particularly traditional savoury flavour and are a lovely choice if you already have them from preparing a roast.

    For an easier everyday option, use a neutral oil with a high smoke point, such as vegetable or canola oil.

    Avoid butter for heating the muffin tin at high temperature. Its milk solids can burn before the Yorkshire puddings have finished baking.

    Brit & Skillet Tip: You only need a small amount of fat in each muffin cup. The goal is to create a very hot surface for the batter to hit — not to deep-fry your Yorkshire puddings.

    Step-by-Step Instructions

    1. Make the Batter

    Place the flour and salt in a large mixing bowl and whisk together.

    In a separate bowl or measuring jug, whisk the eggs and milk until well combined.

    Gradually pour the egg and milk mixture into the flour, whisking as you go, until you have a smooth, fairly thin batter with no obvious lumps.

    Cover the bowl and let the batter rest at room temperature for about 30 minutes.

    2. Heat the Oven and Muffin Tin

    Preheat the oven to 425°F (220°C).

    Add approximately ½ teaspoon of oil or beef drippings to each cup of a standard 12-cup muffin tin.

    Place the tin in the hot oven for about 5–7 minutes, until the tin and fat are very hot.

    Have your rested batter ready before removing the tin from the oven.

    3. Fill the Tin

    Carefully remove the hot muffin tin from the oven and place it on a heatproof surface.

    Working quickly but carefully, divide the batter between the muffin cups, filling each approximately one-third to halfway full.

    You should hear a little sizzle as the batter meets the hot fat.

    Return the tin to the oven immediately.

    4. Bake the Yorkshire Puddings

    Bake for 20–25 minutes, until the Yorkshire puddings are well risen, crisp and deeply golden.

    Do not open the oven door during the first 20 minutes of baking. A sudden drop in temperature can interfere with their rise.

    Once they’re puffed and nicely browned, remove them from the oven and serve while hot.

    Brit & Skillet Tip: Have everything ready before that hot muffin tin comes out of the oven. The less time the tin spends cooling on the counter, the better chance your Yorkshire puddings have of getting a lovely rise.

    How to Serve Yorkshire Puddings

    Yorkshire puddings are at their best served hot from the oven, when the edges are crisp and the centres are still soft.

    The classic way to serve them is alongside a Sunday roast with plenty of gravy. Roast beef is the traditional pairing most people associate with Yorkshire pudding, but there’s absolutely no reason to save them only for beef — they’re lovely alongside other roast dinners too.

    And whatever you serve them with, those hollow centres are practically asking to be filled with gravy.

    Yorkshire Pudding Troubleshooting

    Why Didn’t My Yorkshire Puddings Rise?

    There are a few common culprits. The oven or muffin tin may not have been hot enough, the hot tin may have sat out too long while you added the batter, or the oven door may have been opened too early.

    For the best rise, make sure the oven, tin and fat are properly hot before the batter goes in.

    Why Did My Yorkshire Puddings Collapse?

    A little settling after they leave the oven is normal. If they collapse dramatically, they may simply need a little longer in the oven to set and crisp.

    Look for Yorkshire puddings that are deeply golden rather than pale before taking them out.

    Can I Make Yorkshire Puddings Ahead of Time?

    Yes. Although they’re particularly good fresh from the oven, Yorkshire puddings can be made ahead and reheated.

    Allow them to cool completely, then store them in an airtight container in the refrigerator for up to 2 days.

    To reheat, place them on a baking sheet in a 400°F (200°C) oven for about 5 minutes, or until hot and crisp again.

    Can I Freeze Yorkshire Puddings?

    Yes. Once completely cool, place them in a freezer-safe container or bag and freeze for up to 1 month.

    Reheat them from frozen in a 400°F (200°C) oven for approximately 6–8 minutes, until heated through and crisp.

    Brit & Skillet Tip: The microwave will warm a Yorkshire pudding, but it won’t do its crisp edges any favours. A few minutes in a hot oven is worth the extra wait.

    Bring a British Sunday Roast to Your American Kitchen

    Yorkshire puddings might look impressive when they come puffed and golden from the oven, but they’re made from some of the simplest ingredients in the kitchen.

    Once you know the trick — a rested batter, a properly hot tin and no opening the oven door too soon — they’re surprisingly straightforward to make.

    Serve them alongside your favourite roast, give them plenty of gravy, and you’ve got one of the most recognisable parts of a proper British Sunday dinner.

    If you’d like to explore more dishes from across the pond, have a browse through our traditional British recipes for more British favourites adapted for an American kitchen.

    Happy cooking!


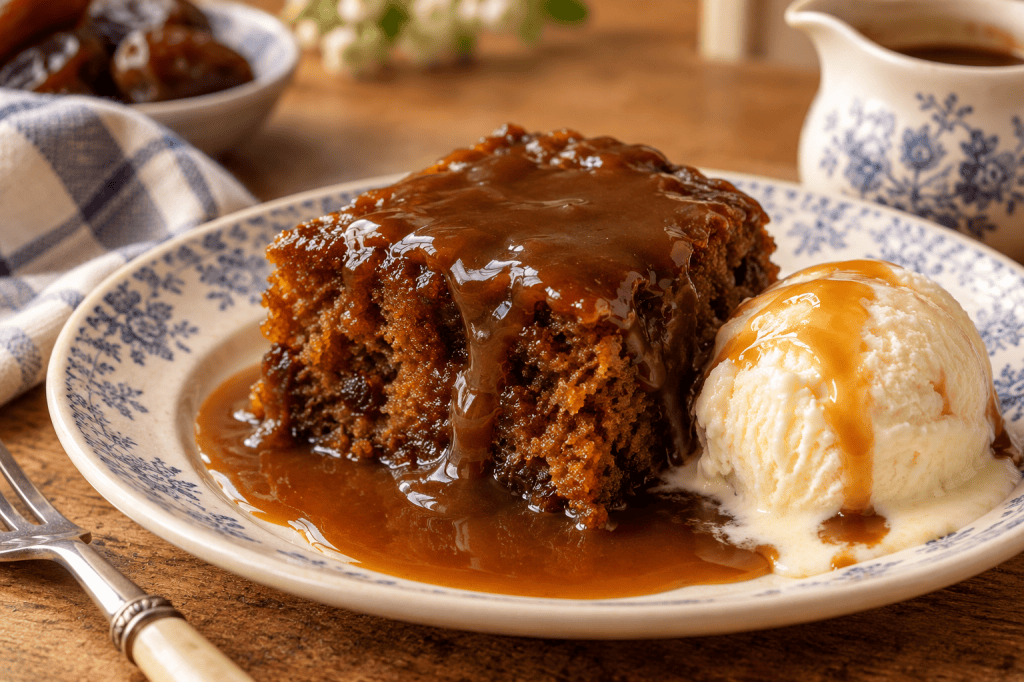
  • Traditional Sticky Toffee Pudding: A Classic British Dessert

    Traditional Sticky Toffee Pudding: A Classic British Dessert

    Sticky toffee pudding is exactly the sort of British dessert that earns its name — a soft, date-filled sponge served warm with a rich toffee sauce poured generously over the top.

    Despite the word pudding, you won’t find anything resembling an American pudding cup here. In Britain, pudding can simply mean dessert, and sticky toffee pudding is a wonderfully good example: warm sponge, plenty of sauce, and something creamy alongside if you fancy it.

    If you’re making it in an American kitchen, there’s nothing particularly complicated to track down. Medjool dates are readily available, the rest of the ingredients are familiar baking staples, and I’ll give you both US measurements and metric weights throughout.

    Serve it warm with vanilla ice cream, whipped cream, or a little pouring cream — and don’t be shy with the toffee sauce.

    Brit & Skillet Tip: Sticky toffee pudding is all about the contrast between the warm sponge and that rich sauce. Keep a little extra sauce at the table so everyone can add another spoonful to their serving.

    What Is Sticky Toffee Pudding?

    Sticky toffee pudding is a warm British dessert made with a soft sponge cake containing finely chopped or softened dates, served with a rich toffee sauce.

    And if you’re American, the name can be slightly confusing. This isn’t “pudding” in the American sense of a smooth, custard-like dessert. In Britain, pudding is also used for a variety of cooked desserts — and sometimes simply as another word for dessert itself.

    The dates are an important part of sticky toffee pudding, but the finished sponge doesn’t taste overwhelmingly of dates. Instead, they contribute sweetness, moisture and a deep caramel-like flavour that works beautifully with the buttery toffee sauce.

    Sticky toffee pudding is generally served warm rather than cold, with plenty of sauce spooned over the sponge. Vanilla ice cream is particularly good alongside it, although cream or custard are lovely options too.

    Brit & Skillet Tip: If someone in your American household insists they “don’t like dates,” don’t write this pudding off immediately. The dates become part of the soft sponge rather than sitting in obvious pieces throughout the dessert.

    Traditional Sticky Toffee Pudding Recipe

    Prep Time: 25 minutes
    Bake Time: 30–35 minutes
    Yield: 8 servings
    Pan: 8-inch (20cm) square baking pan

    Ingredients

    For the Sticky Toffee Sponge

    • 1 cup (175g) pitted dates, finely chopped
    • ¾ cup (180ml) boiling water
    • 1 teaspoon baking soda
    • 1½ cups (180g) all-purpose flour
    • 1 teaspoon baking powder
    • ¼ teaspoon salt
    • ½ cup (113g) unsalted butter, softened
    • ¾ cup (150g) packed light brown sugar
    • 2 large eggs, at room temperature
    • 1 teaspoon vanilla extract

    For the Toffee Sauce

    • ½ cup (113g) unsalted butter
    • 1 cup (200g) packed dark brown sugar
    • 1 cup (240ml) heavy cream
    • 1 teaspoon vanilla extract
    • Pinch of salt

    For Serving, Optional

    • Vanilla ice cream
    • Heavy or pouring cream
    • Warm custard

    Brit & Skillet Tip: In an American supermarket, look for pitted dates in the dried-fruit or produce section. Medjool dates work beautifully, but you don’t need an expensive specialty variety to make a good sticky toffee pudding.

    Step-by-Step Instructions

    1. Prepare the Dates

    Place the finely chopped dates in a heatproof bowl and pour over the ¾ cup (180ml) boiling water.

    Stir in the baking soda and leave the mixture to sit for about 10 minutes, until the dates have softened.

    Using a fork, lightly mash the softened dates and their soaking liquid. You don’t need to make them completely smooth — just break up any larger pieces.

    2. Prepare the Pan and Dry Ingredients

    Preheat the oven to 350°F (175°C).

    Lightly grease an 8-inch (20cm) square baking pan and line the bottom with parchment paper, leaving enough overhang to help lift the pudding out later.

    In a medium bowl, whisk together the all-purpose flour, baking powder and salt. Set aside.

    3. Make the Sponge Batter

    In a large mixing bowl, beat the softened butter and brown sugar together until lighter and creamy.

    Add the eggs one at a time, beating well after each addition. Mix in the vanilla.

    Add the flour mixture and gently mix until just combined.

    Fold in the softened date mixture, including all of the soaking liquid, until evenly incorporated.

    4. Bake

    Spread the batter evenly in the prepared pan.

    Bake for 30–35 minutes, or until the top is set and a toothpick inserted into the centre comes out clean or with just a few moist crumbs attached.

    Let the pudding cool in the pan for about 10 minutes while you make the toffee sauce.

    Brit & Skillet Tip: Once the flour goes into the batter, mix only until everything is combined. Overmixing can make a soft sponge heavier than it needs to be.

    Make the Toffee Sauce

    While the pudding is cooling, place the butter, dark brown sugar, heavy cream and salt in a medium saucepan.

    Heat gently over medium-low heat, stirring until the butter has melted and the sugar has dissolved.

    Bring the mixture to a gentle simmer and cook for about 3–4 minutes, stirring occasionally, until the sauce is smooth and slightly thickened.

    Remove from the heat and stir in the vanilla extract.

    Serve the Sticky Toffee Pudding

    Cut the warm pudding into squares and spoon a generous amount of warm toffee sauce over each serving.

    Serve immediately with vanilla ice cream, pouring cream or warm custard if you like — and put the remaining toffee sauce on the table for anyone who wants a little extra.

    For an even more indulgent pudding, you can spoon a little of the warm sauce over the sponge while it is still in the pan and allow it to soak in for a few minutes before serving. Keep the rest of the sauce for pouring over individual portions.

    Brit & Skillet Tip: The sauce will thicken as it cools. If you’re serving it later, warm it gently in a saucepan over low heat, stirring until it becomes pourable again.

    How to Store Sticky Toffee Pudding

    Once completely cool, cover the pudding and store it in the refrigerator for up to 3 days.

    Keep the toffee sauce in a separate covered container in the refrigerator. When you’re ready to serve, gently reheat the pudding and sauce separately, then pour the warm sauce over each serving.

    How to Reheat Sticky Toffee Pudding

    For individual portions, place a piece of pudding on a microwave-safe plate and heat it in short intervals until warmed through.

    The toffee sauce can be reheated gently in a small saucepan over low heat, stirring frequently. If it has become very thick in the refrigerator, a small splash of cream can help loosen it.

    Sticky Toffee Pudding Troubleshooting

    Why is my sponge heavy?

    Be careful not to overmix the batter once you’ve added the flour. Mix just until everything comes together, then gently fold in the date mixture.

    Do I need to blend the dates?

    No. Finely chopping the dates and lightly mashing them after soaking is enough. They’ll soften considerably and become part of the texture of the sponge.

    Can I make sticky toffee pudding ahead of time?

    Yes. You can make the sponge and toffee sauce ahead, refrigerate them separately, and gently reheat them before serving. This makes sticky toffee pudding particularly handy when you don’t want to be making dessert at the last minute.

    What’s the American equivalent of double cream?

    For this recipe, heavy cream is the easy American choice for the toffee sauce. If you’re serving additional cream alongside the pudding, heavy cream can also be used.

    Brit & Skillet Tip: If British recipes leave you wondering about unfamiliar measurements, tin sizes or ingredient names, our British Baking Measurements for American Recipes guide can help take some of the guesswork out of converting them.

    A Proper British Pudding for Your American Kitchen

    Sticky toffee pudding is one of those desserts that feels especially comforting when served warm — soft date sponge, plenty of rich toffee sauce, and something cool and creamy alongside if you fancy it.

    And although it might sound very British, there’s nothing difficult about making it in an American kitchen. With familiar ingredients and a standard 8-inch baking pan, you can bring this classic-style British pudding straight to your own table.

    If this has put you in the mood for more British baking, have a browse through our traditional British recipes for more cakes, puddings and bakes to try next.

    Happy baking!


  • Traditional British Jam Tarts: An Easy Recipe for American Bakers

    Traditional British Jam Tarts: An Easy Recipe for American Bakers

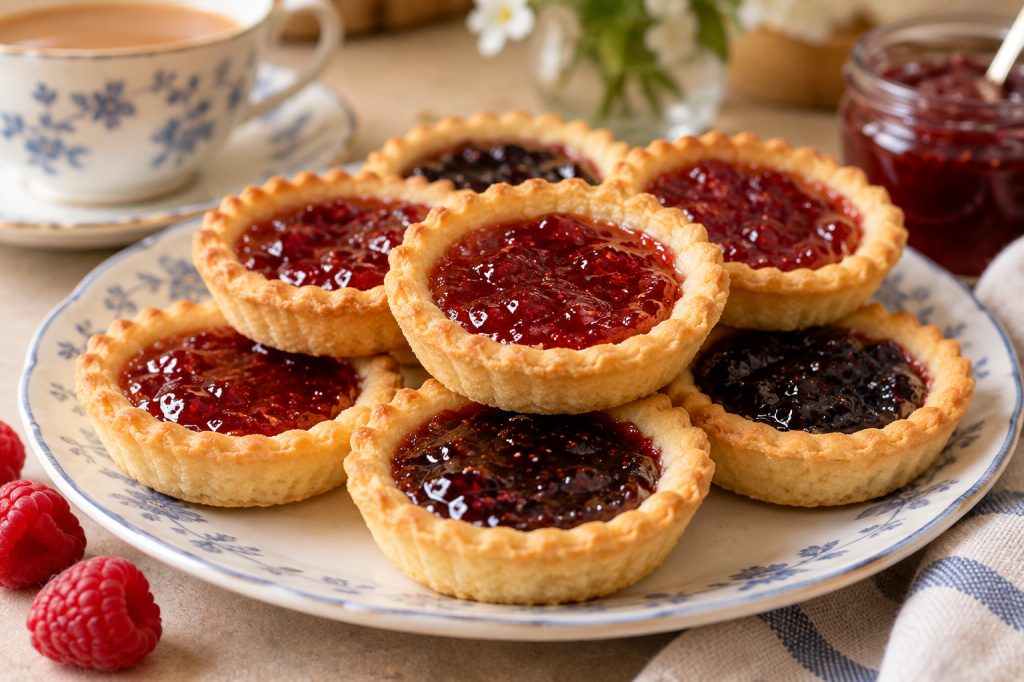
    Jam tarts are one of those wonderfully simple British bakes that many of us remember from childhood — crisp, buttery pastry filled with a spoonful of bright, sticky jam.

    They don’t require fancy ingredients or complicated techniques, which makes them a lovely place to start if you’re exploring British baking from an American kitchen.

    In this recipe, I’ll show you how to make traditional British jam tarts using homemade shortcrust pastry, with both British and American measurements along the way. I’ll also explain a few of the British baking terms you might encounter, so there’s no need to wonder whether plain flour belongs in your pantry or exactly what caster sugar is.

    Raspberry jam is a classic choice, but strawberry, blackcurrant, or another favorite preserve can work beautifully too.

    Brit & Skillet Tip: Don’t be tempted to overfill your tarts. A little jam goes a surprisingly long way once it gets hot in the oven — and too much can bubble over the pastry and make a very sticky baking tin!

    What Are British Jam Tarts?

    British jam tarts are small, open-faced pastry tarts made with shortcrust pastry and a spoonful of fruit jam. They’re simple, sweet, and exactly the sort of bake that proves you don’t need a long ingredient list to make something lovely.

    Unlike a full-size fruit tart or pie, there’s no top crust and no complicated filling to prepare. The jam goes straight into the pastry cases before baking, where it becomes glossy and bubbling while the pastry turns lightly golden.

    You’ll often see jam tarts made with raspberry, strawberry, or blackcurrant jam, and making a mixture of flavors is an easy way to turn one batch into a colorful little assortment.

    British Baking Terms for American Bakers

    If you’re following British recipes in the U.S., a few of the ingredients and terms can sound unfamiliar. Here’s what they mean for this recipe:

    Plain flour: British plain flour is the closest everyday equivalent to American all-purpose flour. Standard U.S. all-purpose flour works well for these jam tarts.

    Caster sugar: A finer-grained white sugar than regular American granulated sugar. It dissolves quickly, but you don’t need to abandon the recipe if you don’t have it — regular granulated sugar can work here too.

    Shortcrust pastry: A tender, crumbly pastry commonly used for British sweet and savory pies and tarts. For these jam tarts, we’re making a simple sweetened shortcrust from scratch.

    Traditional British Jam Tarts Recipe

    Prep Time: 25 minutes
    Chill Time: 20 minutes
    Bake Time: 15–18 minutes
    Yield: About 12 jam tarts

    Ingredients

    For the Shortcrust Pastry

    • 1½ cups (180g) all-purpose flour
    • ⅓ cup (75g) unsalted butter, cold and cut into small cubes
    • 2 tablespoons (25g) caster sugar or granulated sugar
    • Pinch of salt
    • 3–4 tablespoons (45–60ml) ice-cold water, added as needed

    For the Filling

    • ⅓–½ cup (about 110–160g) fruit jam, depending on the size of your tarts

    Good choices include: raspberry, strawberry, blackcurrant, or a mixture so everyone can choose their favorite.

    Brit & Skillet Tip: Keep the butter and water cold when making your pastry. You also may not need all of the water — add it gradually and stop as soon as the dough will hold together.

    Step-by-Step Instructions

    1. Make the Shortcrust Pastry

    In a medium mixing bowl, whisk together the flour, sugar, and salt.

    Add the cold, cubed butter. Using your fingertips or a pastry blender, gently rub the butter into the flour until the mixture resembles fine breadcrumbs.

    Add the ice-cold water one tablespoon at a time, mixing gently with a fork. Stop adding water as soon as the dough begins to come together. It should hold together when pressed without feeling wet or sticky.

    Bring the dough together gently with your hands, then flatten it into a disc. Wrap and refrigerate for at least 20 minutes.

    Brit & Skillet Tip: Try not to knead the pastry as you would bread dough. Handle it only as much as necessary to bring it together — this helps keep the finished pastry tender.

    2. Roll and Cut the Pastry

    Preheat the oven to 375°F (190°C). Lightly grease a standard 12-cup muffin tin.

    On a lightly floured work surface, roll the chilled pastry to approximately ⅛ inch (3mm) thick.

    Using a round pastry cutter approximately 3 inches (7.5cm) across, cut circles from the pastry. Gather and gently re-roll the scraps as needed.

    Carefully press each pastry circle into a muffin cup. There’s no need to push the pastry all the way up the sides — jam tarts should remain fairly shallow.

    3. Add the Jam and Bake

    Spoon approximately 1 teaspoon of jam into each pastry case. Resist the temptation to add more; the jam becomes very hot and bubbly as it bakes and can overflow if the cases are too full.

    Bake for 15–18 minutes, or until the pastry is lightly golden around the edges.

    Leave the jam tarts in the tin for about 10 minutes, then carefully transfer them to a wire rack to finish cooling.

    Brit & Skillet Tip: That glossy jam may look irresistible when the tarts first come out of the oven, but it will be extremely hot. Give the tarts plenty of time to cool before taking that first bite.

    Serving Your Jam Tarts

    Jam tarts are lovely once they’ve cooled and the filling has had time to set. Serve them just as they are with a cup of tea, or add them to a plate of British bakes for an afternoon treat.

    If you’re putting together a little British-style spread, they’d sit very happily alongside Classic British Scones or a slice of Classic Victoria Sponge Cake.

    Brit & Skillet Tip: Making several flavours in one batch is an easy way to make a simple plate of jam tarts look especially inviting. Try raspberry, strawberry and blackcurrant — just remember which is which before everyone starts choosing!

    How to Store Jam Tarts

    Once completely cool, store the jam tarts in an airtight container at room temperature. They’re best enjoyed within 2–3 days, while the pastry still has a nice texture.

    If your kitchen is particularly warm, you can refrigerate them, although chilling can make the pastry a little firmer. Let them come back towards room temperature before serving.

    Jam Tart Variations

    One of the nicest things about jam tarts is how easily you can change the flavour without changing the recipe. Use one favourite jam for the whole batch or divide the pastry cases between several different preserves.

    Raspberry: A lovely choice with a little tartness to balance the sweet pastry.

    Strawberry: Sweet, familiar and particularly good if you’re making these for children or a mixed crowd.

    Blackcurrant: A distinctly British favourite with a deeper, tangier fruit flavour.

    You can also use other jams you already have in the cupboard. Just choose a fairly smooth preserve that will sit easily inside the little pastry cases.

    Troubleshooting Your Jam Tarts

    Why did my pastry shrink?

    Pastry can shrink if it becomes too warm or is stretched while being fitted into the tin. Chilling the dough before rolling and gently laying it into the muffin cups rather than pulling it into place can help.

    Why did my jam overflow?

    There was probably a little too much in the pastry case. Jam expands and bubbles considerably as it heats, which is why about one teaspoon per tart is a good starting point.

    Why is my pastry tough?

    The dough may have been overworked or had more water added than it needed. Add the water gradually and handle the pastry as little as possible once it comes together.

    Can I use ready-made pastry?

    Yes. If you want a quicker version, a refrigerated ready-made pie crust can be used instead of making the shortcrust pastry from scratch. Cut it into circles to fit your tin, then continue with the filling and baking instructions.

    Brit & Skillet Tip: American muffin tins can vary in shape and depth. You’re aiming for a shallow little pastry case rather than pastry reaching all the way to the top of the muffin cup. If you’re unsure about British and American bakeware sizes, take a look at our British Baking Equipment Guide.

    A Little Taste of Britain

    There’s something rather lovely about a bake as simple as a jam tart. A handful of everyday ingredients, a jar of your favourite jam, and you’ve got a tray of little treats that feel right at home beside a proper cup of tea.

    And once you’ve made shortcrust pastry from scratch, you’ve also got another useful bit of British baking tucked under your belt.

    If you enjoyed making these, have a browse through our traditional British recipes for more bakes to bring a little taste of Britain into your American kitchen.

    Happy baking!