Tag: american bakers

  • Classic British Scones: An Easy Recipe for American Bakers

    Classic British Scones: An Easy Recipe for American Bakers

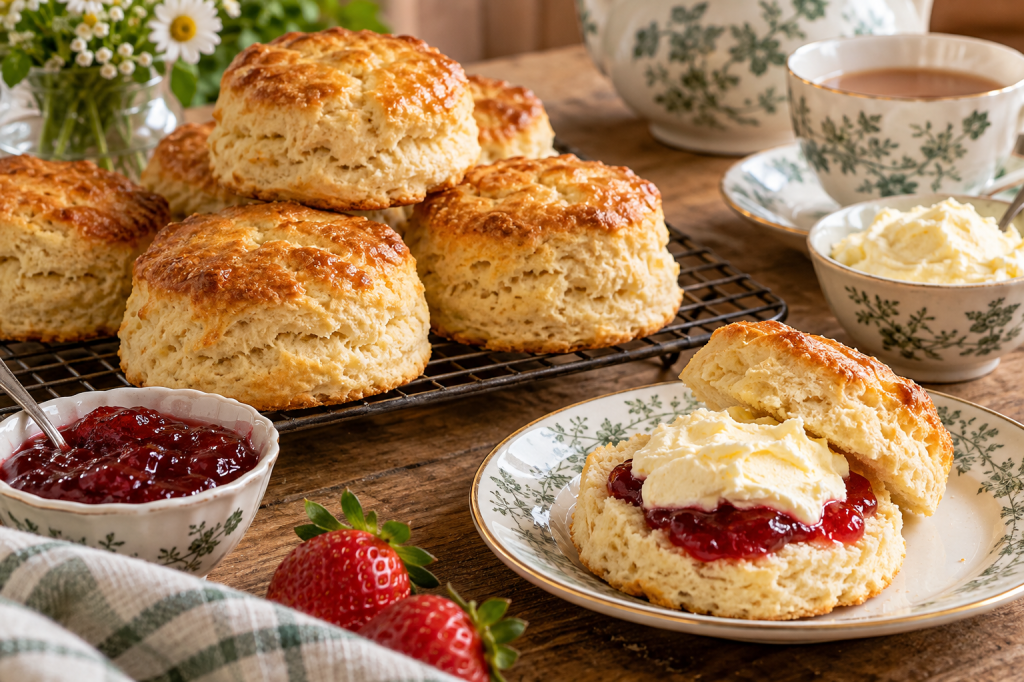
    British scones are one of those recipes that prove simple ingredients can make something genuinely special. Light, tender, and just slightly crumbly, they’re traditionally served with jam and clotted cream as part of a British afternoon tea — although they’re just as welcome with a cup of tea at the kitchen table.

    If you’re baking British scones in an American kitchen, there are a few differences worth knowing. British scones aren’t quite the same as the large, sweet, often flavored scones commonly sold in American coffee shops. They’re usually smaller, less sweet, and designed to be split open and topped generously with jam and cream.

    This recipe is designed specifically for American bakers, with both US and metric measurements and ingredients you can find in a typical American grocery store. I’ll also explain the little details that help give a traditional British scone its characteristic height, soft center, and golden top.

    Recipe at a Glance

    Prep time: 15 minutes
    Bake time: 12–15 minutes
    Total time: About 30 minutes
    Yield: 8 scones
    Oven: 425°F / 220°C (200°C fan)

    Difficulty: Easy

    These are classic plain British scones: lightly sweetened, tender in the center, and made for splitting and serving with jam and clotted cream. The dough comes together quickly, but handling it gently is the key to getting tall, soft scones rather than dense ones.

    Ingredients

    2 cups (250 g) all-purpose flour
    4 teaspoons (16 g) baking powder
    ¼ teaspoon fine salt
    3 tablespoons (38 g) granulated sugar
    6 tablespoons (85 g) unsalted butter, cold and cut into small cubes
    ⅔ cup (160 ml) whole milk, plus a little extra if needed
    1 large egg
    1 teaspoon vanilla extract (optional)
    A little milk or beaten egg, for brushing the tops

    A Note for American Bakers

    In Britain, traditional scones are commonly made with self-raising flour. Because American self-rising flour isn’t necessarily formulated in exactly the same way, this recipe uses all-purpose flour and baking powder so you have more control over the leavening.

    If you’re measuring by volume, spoon the flour lightly into your measuring cup and level it rather than scooping directly from the bag. For the most consistent results, though, weighing the flour in grams is the better option — especially when following British-style baking recipes.

    Instructions

    1. Preheat the oven.
    Heat your oven to 425°F / 220°C (200°C fan). Line a baking sheet with parchment paper.

    2. Combine the dry ingredients.
    Place the flour, baking powder, salt, and sugar in a large mixing bowl and whisk briefly to combine.

    3. Rub in the butter.
    Add the cold cubed butter. Using your fingertips, rub the butter into the flour until the mixture resembles fine breadcrumbs. Work fairly quickly so the butter stays cool.

    4. Mix the wet ingredients.
    In a separate bowl or measuring jug, whisk together the milk, egg, and vanilla, if using. Reserve about 1 tablespoon of the mixture for brushing the tops, or use a little additional milk instead.

    5. Bring the dough together.
    Make a well in the flour mixture and pour in most of the wet ingredients. Gently mix with a butter knife or spatula until a soft, slightly sticky dough begins to form. Add the remaining liquid only if needed. Avoid overmixing.

    6. Shape the dough.
    Turn the dough onto a lightly floured surface. Gently bring it together with your hands, then pat it to about 1 inch (2.5 cm) thick. There’s no need to knead it like bread dough.

    7. Cut the scones.
    Use a floured 2½-inch (6 cm) round cutter to cut out the scones. Press the cutter straight down rather than twisting it, which can interfere with an even rise. Gently bring the scraps together and cut the remaining scones.

    8. Brush the tops.
    Arrange the scones on the prepared baking sheet and lightly brush the tops with the reserved egg-and-milk mixture or a little milk. Try not to let the wash run down the sides.

    9. Bake.
    Bake for approximately 12–15 minutes, until the scones have risen well and the tops are golden brown.

    10. Cool slightly and serve.
    Transfer the scones to a wire rack and allow them to cool for a few minutes. They’re at their best served slightly warm, split open and topped with jam and clotted cream.

    How to Get Tall, Fluffy British Scones

    Keep everything cool. Cold butter helps create a tender texture. If your kitchen is particularly warm and the dough becomes very soft while you’re working with it, place the shaped scones in the refrigerator for about 10 minutes before baking.

    Don’t overwork the dough. Mix only until the ingredients come together. Kneading or repeatedly rolling the dough can develop too much gluten and produce tougher scones.

    Keep the dough fairly thick. Pat the dough to about 1 inch (2.5 cm) thick before cutting. Starting with dough that’s too thin is one of the easiest ways to end up with flat scones.

    Cut straight down. Dip your cutter in flour and press firmly through the dough without twisting. Twisting can seal the edges and make it harder for the scones to rise evenly.

    Use fresh baking powder. Scones rely on a generous amount of chemical leavening for their rise. If your baking powder has been sitting in the cupboard for a very long time, replacing it can make a noticeable difference.

    Brush only the tops. When applying the egg wash or milk, avoid letting it drip down the cut sides. Keeping those sides clean helps the scones expand freely in the oven.

    What Should a British Scone Be Like?

    A classic British scone should be lightly golden on top with a soft, tender interior and enough structure to split in half without crumbling apart. It shouldn’t be as sweet or rich as many American bakery-style scones — most of the sweetness traditionally comes from whatever you put on top.

    That simpler style is precisely what makes British scones so good with strawberry jam and clotted cream.

    How to Serve British Scones

    British scones are traditionally served split in half with jam and clotted cream, usually alongside a pot of tea. Strawberry jam is the classic choice, although raspberry jam and other preserves work beautifully too.

    If you can’t easily find clotted cream in the United States, look in specialty grocery stores, British import shops, or well-stocked supermarkets. Whipped cream can work in a pinch, although its lighter texture and flavor aren’t quite the same as traditional clotted cream.

    Jam First or Cream First?

    This seemingly innocent question has inspired a surprisingly passionate British debate.

    In Cornwall, the traditional approach is generally jam first, followed by clotted cream. In Devon, the traditional order is generally clotted cream first, followed by jam.

    At Brit & Skillet, there’s only one rule that really matters: use plenty of both. Whether you’re Team Cornwall or Team Devon is entirely up to you.

    Storage and Freezing

    To store: British scones are best eaten on the day they’re baked, but leftovers can be kept in an airtight container at room temperature for up to 2 days. Warm them briefly before serving to refresh their texture.

    To freeze: Allow the baked scones to cool completely, then freeze them in an airtight container or freezer bag for up to 3 months. Thaw at room temperature and warm gently in the oven before serving.

    For the best experience: Don’t add jam or clotted cream until you’re ready to eat them.

    Helpful Notes for American Bakers

    Weighing your ingredients: British baking traditionally relies much more heavily on weight measurements than American baking. If you have a digital kitchen scale, using the gram measurements in this recipe will give you the most consistent results.

    Flour differences: British self-raising flour and American self-rising flour aren’t always interchangeable. That’s why this recipe uses all-purpose flour with baking powder rather than relying on self-rising flour.

    Ingredient tip: If you’re looking for a reliable all-purpose flour for British baking, King Arthur Unbleached All-Purpose Flour is a useful option for recipes like these scones.

    British measurements: If you’re making more British recipes, becoming comfortable with grams will make following traditional recipes considerably easier — and there’s no need to abandon your measuring cups completely.

    Equipment: You don’t need any unusual equipment to make scones. A mixing bowl, baking sheet, round cutter, and basic kitchen scale are enough for consistent results.

    A Little Taste of Britain at Home

    There’s something wonderfully comforting about a batch of freshly baked British scones. They don’t require complicated ingredients or elaborate decorating — just a few pantry staples, a hot oven, and preferably a generous supply of jam and clotted cream.

    For American bakers discovering British baking, scones are also a perfect place to start. Once you become comfortable weighing ingredients in grams and working with a simple British-style dough, an entire world of cakes, biscuits, puddings, and afternoon-tea favorites starts to feel much more approachable.

    Serve these slightly warm, put the kettle on, and settle the great jam-versus-cream debate however you see fit.

    Enjoy!


    Affiliate disclosure: Brit & Skillet may earn a commission from qualifying purchases made through links on this page, at no additional cost to you.
  • British Baking Terms Explained: A Guide for American Bakers.

    British Baking Terms Explained: A Guide for American Bakers.

    Sometimes the trickiest part of a British baking recipe comes before you turn on the oven.

    You’ve gathered the ingredients and found the right tin. Then the recipe tells you to “rub in the butter” or mix until you reach “a soft dropping consistency.”

    If those instructions sound unfamiliar, you’re not alone.

    This guide explains common British baking terms in plain language for American home bakers. We’ll cover equipment names, mixing instructions, and the texture clues that help you understand what the recipe is asking you to do.

    Think of it as a little translation help for your kitchen counter. Same baking adventure, fewer pauses to wonder what “treacle” means.

    Baking Tins, Trays, and Other Equipment Names

    British recipes sometimes use a different name for a tool you already own. Before buying something new, check whether the unfamiliar item is hiding in your cupboard under its American name.

    Baking Tin

    A “baking tin” is a baking pan. The term doesn’t mean it must be made from tin.

    You’ll see references to cake tins, loaf tins, and muffin tins. Match the dimensions and shape specified in the recipe rather than relying on the name alone.

    Sandwich Tin

    A sandwich tin is a shallow round cake pan used to bake individual cake layers, often for a Victoria sponge.

    The “sandwich” refers to the layers with filling between them. No bread required.

    Baking Tray

    A baking tray generally means a baking sheet. However, pay attention to the recipe: a tray used for biscuits is different from a deeper tin needed to hold traybake batter.

    Cooling Wire

    If a recipe tells you to transfer something to a “cooling wire” or “wire rack,” it means a cooling rack.

    Follow the instructions about when to remove the bake from its tin. Some cakes need a little time to firm up before being moved.

    Palette Knife

    A palette knife is a flat, blunt tool used for jobs such as spreading icing. Depending on the task, an American icing spatula or offset spatula may serve the same purpose.

    For more help matching equipment to your recipe, see our British Baking Equipment Guide: Everything an American Kitchen Needs.

    Rub In”: Working Butter Into Flour

    When a British recipe tells you to “rub in the butter,” it means working the fat into the flour with your fingertips.

    You may encounter this instruction in recipes for scones, crumble toppings, and some pastries. American recipes often describe a similar task as “cutting in” the butter or fat.

    How to Do It

    Follow your recipe’s directions for the butter’s temperature and preparation. For many rubbing-in methods, you’ll start with cold butter cut into small pieces.

    Coat the pieces in flour, then gently rub them between your fingertips and thumbs, letting the mixture fall back into the bowl as you work.

    Use a light touch. The aim is to distribute the fat through the flour without turning it into a warm, greasy paste.

    What Should It Look Like?

    Many recipes ask for a mixture resembling breadcrumbs. Others call for some larger pieces of butter to remain.

    Follow the texture described in your particular recipe. Those differences can affect the finished bake, so “keep going until every lump disappears” isn’t a universal rule.

    Does “Cut In” Mean Exactly the Same Thing?

    The terms describe closely related ways of combining solid fat with flour. “Rub in” usually specifies your fingertips, while “cut in” often involves a pastry blender or other cutting tool.

    The recipe’s target texture matters more than making the wording match perfectly.

    And no, “rub in” does not mean rubbing butter into the baking tin. That’s a separate job—and a much quicker one.

    Cream Together”: Beating Butter and Sugar

    When a recipe asks you to “cream the butter and sugar,” it means beating them together until they reach the texture described in the recipe.

    There’s no cream to add. Here, “cream” is a mixing instruction rather than an ingredient.

    Start With the Right Butter

    For a typical creaming method, the butter should be softened enough to beat but still hold its shape. It shouldn’t be melted or oily.

    Follow your recipe’s directions. Butter that is too cold can be difficult to combine, while melted butter won’t behave the same way during creaming.

    What Does “Light and Fluffy” Mean?

    As you beat the butter and sugar, the mixture should become paler and look more aerated. Scrape down the bowl occasionally so everything mixes evenly.

    You may still feel some sugar grains. “Light and fluffy” doesn’t necessarily mean the sugar has completely dissolved.

    Can You Do It by Hand?

    Yes. Softened butter and sugar can be creamed with a wooden spoon, although it takes effort. An electric hand mixer or stand mixer can make the job easier.

    Use the recipe’s texture cues alongside any suggested mixing time. The time needed can vary with the equipment, quantity, and butter temperature.

    Is This a British-Only Term?

    No—American recipes use “cream together” too. It’s included here because it’s easy to mistake a familiar food word for an instruction to add another ingredient.

    Keep the cream in the fridge unless the ingredient list actually asks for it.

    Fold In”: Combining Ingredients Gently

    When a recipe tells you to “fold in” an ingredient, it means combining it gently, often to preserve air already beaten into the mixture.

    You’ll see this instruction when adding flour to an aerated cake mixture or combining whipped egg whites with another mixture.

    How to Fold

    Use a flexible spatula or a large spoon. Cut down through the mixture, sweep along the bottom of the bowl, then lift and turn the mixture over itself.

    Rotate the bowl and repeat, reaching the bottom so pockets of flour or unmixed ingredients don’t remain hidden.

    Gentle Doesn’t Mean Incomplete

    Stop when the ingredients are evenly combined and no unwanted streaks or dry pockets remain.

    The aim is to mix thoroughly with as little unnecessary handling as possible. A beautifully airy mixture with a pocket of dry flour in the middle still needs another fold.

    Why Not Keep Using the Mixer?

    Beating and folding do different jobs. Vigorous mixing at this stage can knock air out of a delicate mixture.

    If the recipe asks you to switch from beating to folding, pause the mixer and follow that change in method.

    Add Ingredients as Directed

    Some recipes ask you to fold ingredients in several additions. Others have you stir in a small amount first to loosen a thicker mixture before folding in the rest.

    Follow that sequence rather than adding everything at once. It can make two mixtures with very different textures easier to combine.

    Soft Dropping Consistency”: Knowing When the Mixture Is Ready

    “Soft dropping consistency” describes the texture of a mixture, usually a cake batter.

    It means the mixture is soft enough to fall from a spoon with a gentle shake or tap. It shouldn’t cling stubbornly to the spoon or pour off like a thin liquid.

    How to Check It

    Lift a spoonful of mixture above the bowl, then gently shake or tap the spoon.

    For a soft dropping consistency, the mixture should drop back into the bowl fairly easily. You shouldn’t need to scrape it off.

    What if It Seems Too Thick?

    Check the recipe before adding anything. If it instructs you to add a little milk or another liquid to reach this consistency, add it gradually and check again.

    Don’t add liquid to every thick cake mixture. Some recipes are meant to produce a firmer batter, and changing the balance can affect the bake.

    Texture Is a Clue, Not a Universal Rule

    Use this test only when the recipe calls for it. Sponge cakes, fruit cakes, and other bakes can start with quite different mixtures.

    The useful question is whether your batter matches the description in your recipe—not whether every cake batter in your kitchen behaves the same way.

    Grease and Line”: Preparing the Baking Tin

    When a British recipe tells you to “grease and line” a tin, it means preparing the pan with a little fat and baking parchment to help the finished bake release.

    Grease the Tin

    Apply a thin layer of the butter, oil, or other suitable fat specified in the recipe to the required surfaces.

    A pastry brush or a piece of kitchen paper can help spread it evenly. “Kitchen paper” is the British term for a paper towel.

    Add Baking Parchment

    “Baking parchment” means parchment paper. Cut it to fit the parts of the tin the recipe tells you to line.

    For a round cake tin, that may mean a circle covering the base. A loaf cake recipe may call for lining the base and sides.

    The greased surface helps hold the parchment in place while you add the mixture.

    What Does “Base-Line” Mean?

    If a recipe says to “base-line” the tin, it means lining only the bottom with parchment. Follow any separate instructions about greasing the sides.

    “Line the tin” can be less specific, so look for further directions in the recipe.

    Don’t Substitute Wax Paper

    Wax paper and baking parchment are different products. Use oven-safe parchment rated for your baking temperature.

    Also, don’t assume every tin needs greasing. Some recipes rely on the mixture gripping the sides as it rises, so follow the preparation method given.

    Bake Blind”: Baking a Pastry Case Before Filling It

    “Baking blind” means baking a pastry crust before adding its filling. American recipes often call this “blind baking” or “prebaking.”

    It’s useful when the filling needs less oven time than the pastry—or won’t be baked at all.

    What Is a Pastry Case?

    A “pastry case” is the pastry shell or crust that holds the filling.

    The recipe may ask you to bake it partly or fully before filling it. Those aren’t interchangeable, so check how much further baking the assembled tart or pie will receive.

    What Are Baking Beans?

    “Baking beans” are reusable weights, often ceramic, used to help keep pastry from puffing up during blind baking. American shops commonly label them “pie weights.”

    They normally sit on a lining of baking parchment rather than directly against the pastry.

    Follow the Recipe’s Sequence

    A recipe may tell you to chill the pastry, line it with parchment, add weights, and bake. It may then ask you to remove the lining and weights so the base can bake further.

    Follow its temperatures, timings, and appearance cues. Take care when removing the weights—they’ll be hot.

    Does “Prick the Base” Mean the Same Thing?

    No. Pricking small holes in pastry with a fork is called “docking.” It helps steam escape, but it doesn’t automatically replace baking weights.

    Only do it when your recipe directs you to, particularly if the pastry will hold a liquid filling.

    Despite the name, baking blind is a job best done with your eyes open.

    Turn Out”: Removing a Bake From Its Tin

    When a recipe tells you to “turn out” a cake, loaf, or pudding, it means removing it from the tin, basin, or mould.

    It doesn’t mean turning off the oven, although that deserves remembering too.

    Check When to Do It

    Follow the recipe’s instructions about how long to leave the bake in its tin first.

    Some cakes need a short rest to become firm enough to handle. Other bakes need longer cooling, so don’t assume everything should come out immediately.

    Handle It Gently

    For a cake in a solid tin, turning out often involves placing a cooling rack over the top, holding the rack and tin securely together, and carefully inverting them.

    Use oven gloves if the tin is still hot, and make sure the rack is large enough to support the cake.

    Loose-bottomed and springform tins release differently, so use the method appropriate to your pan and recipe.

    Which Way Up?

    If the recipe asks you to cool the cake upright, you may need a second rack to gently turn it back over.

    For a steamed pudding, turning out usually means inverting it onto a suitable serving plate. Follow the recipe’s timing and take care around the hot basin and any escaping steam.

    What Does “Leave in the Tin” Mean?

    Exactly what it sounds like: let the bake rest or cool inside its baking pan for the stated time.

    This waiting period can be part of the method. Give a delicate cake its few minutes of peace before attempting the grand unveiling.

    Ingredient Names: A Few British-to-American Translations

    Sometimes the method makes sense, but the ingredient list needs translating.

    These common names are a useful starting point. Keep in mind that similar names don’t always mean products behave identically.

    Plain Flour

    Plain flour generally corresponds to American all-purpose flour. Protein content can vary between brands, so results may differ slightly.

    “Plain” means it doesn’t contain added raising agents.

    Self-Raising Flour

    British self-raising flour contains added raising agents. American self-rising flour commonly includes salt as well, and the formulations may differ.

    Don’t assume they’re an exact swap. Follow a substitution designed for the recipe rather than adding baking powder or salt by guesswork.

    Caster Sugar

    Caster sugar is finely granulated sugar, often sold in the United States as superfine sugar.

    It isn’t powdered sugar. Its smaller crystals help it dissolve more readily than ordinary granulated sugar.

    Icing Sugar

    Icing sugar is powdered or confectioners’ sugar. It’s commonly used in icings, buttercream, and dusting.

    Products can contain different anti-caking ingredients, so check the label if that matters for your recipe.

    Bicarbonate of Soda

    Bicarbonate of soda means baking soda. It isn’t the same as baking powder.

    Use the one specified in the recipe—the two aren’t interchangeable spoon for spoon.

    Golden Syrup and Black Treacle

    Golden syrup is a thick, amber sugar syrup. Black treacle is darker and has a stronger flavour.

    Neither name simply means maple syrup. If you can’t find the specified ingredient, look for a substitution suited to that particular recipe, since changing the syrup can change both flavour and texture.

    British Baking Terms at a Glance

    Use this quick-reference list when an unfamiliar instruction interrupts your baking. Your recipe’s specific directions should always guide the details.

    British term or instructionWhat it means
    Baking tinBaking pan
    Sandwich tinShallow round pan for an individual cake layer
    Baking trayBaking sheet; check whether the recipe needs a deeper pan
    Baking parchmentParchment paper
    Kitchen paperPaper towel
    Rub inWork fat into flour with your fingertips
    Cream togetherBeat ingredients, usually butter and sugar, to the stated texture
    Fold inCombine gently, often to preserve air
    Soft dropping consistencyA mixture that drops from a spoon with a gentle shake or tap
    Base-lineLine the bottom of the pan with parchment
    Bake blindBake a pastry shell before adding its filling
    Baking beansPie weights
    Turn outRemove a bake from its pan or mould
    Caster sugarSuperfine sugar
    Icing sugarPowdered or confectioners’ sugar
    Bicarbonate of sodaBaking soda

    Some of these terms appear in American recipes too. The aim isn’t to draw a strict line between two baking languages—it’s to help you keep going when the wording feels unfamiliar.

    Ready to Put the Instructions Into Practice?

    Once you understand the vocabulary, a British baking recipe becomes much easier to follow.

    Read the method before you begin, check unfamiliar ingredients, and pay attention to the texture clues along the way. “Light and fluffy” and “soft dropping consistency” tell you what to look for, alongside the recipe’s timings.

    For help choosing pans and tools, explore our British Baking Equipment Guide: Everything an American Kitchen Needs.

    If grams, millilitres, or oven temperatures are your next question, read How to Convert British Baking Measurements for American Recipes.

    You don’t need to memorise every term before making a start. Keep the recipe close, take it one instruction at a time, and put the kettle on when the work is done.

    British food. American kitchens. A little less lost in translation.