
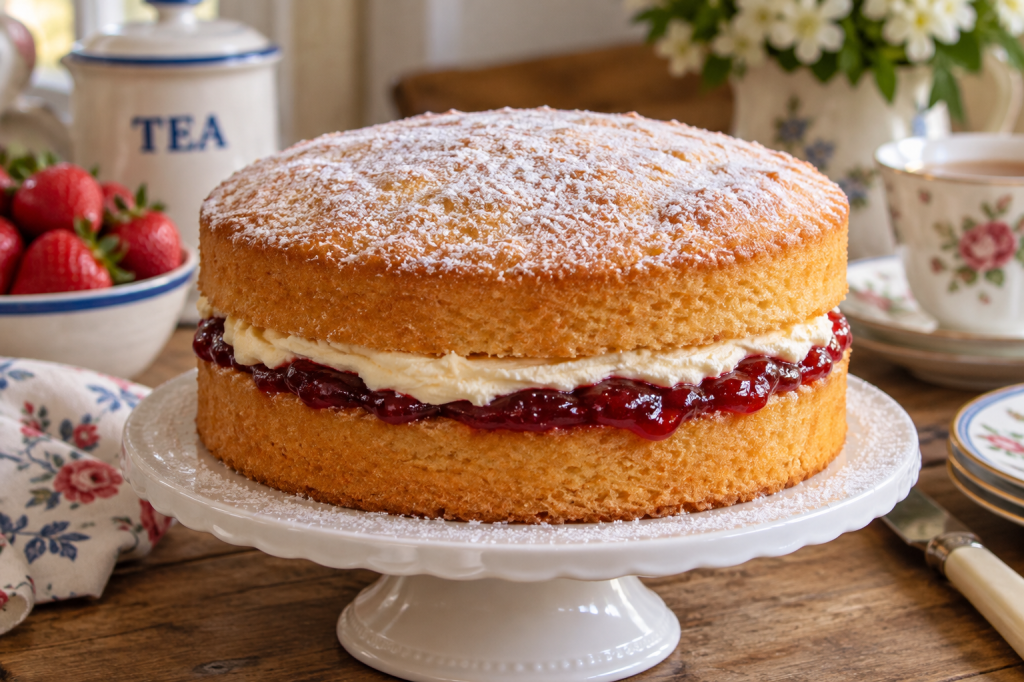
Few cakes are more unmistakably British than a Victoria sponge.
Two light vanilla sponge cakes are sandwiched together with raspberry or strawberry jam, finished with a simple dusting of sugar, and served in generous slices with a cup of tea.
It sounds simple—and it is—but Victoria sponge can be slightly confusing when you’re following a British recipe in an American kitchen. Ingredients such as self-raising flour and caster sugar aren’t always labeled the same way in the United States, British recipes usually give measurements in grams, and the traditional “20cm sandwich tins” aren’t something you’ll necessarily find written on American bakeware.
Fortunately, none of that should stand between you and a proper slice of cake.
This version translates the classic Victoria sponge into measurements and terminology that make sense in an American kitchen while keeping the character of the traditional British bake.
Prep time: 20 minutes
Bake time: 20–25 minutes
Cooling time: about 30 minutes
Yield: One 8-inch two-layer cake, about 8–10 servings
Oven: 350°F / 180°C / 160°C fan
What Is a Victoria Sponge?
A Victoria sponge—also called a Victoria sandwich—is a classic British layer cake traditionally made from butter, sugar, eggs and self-raising flour.
The cake takes its name from Queen Victoria and has become one of the best-known cakes in British baking.
Unlike many American layer cakes, a traditional Victoria sponge doesn’t need elaborate decoration. The two sponge layers are usually sandwiched together with jam, and the top is finished with a dusting of sugar rather than thick frosting.
Some modern versions add buttercream or whipped cream to the filling, but a simple jam-filled sponge remains wonderfully good.
And wonderfully British.
What Size Pans Do You Need?
A British Victoria sponge recipe will often call for two 20cm sandwich tins.
For an American baker, that’s approximately two 8-inch round cake pans.
Using two matching pans is important because the batter is divided between them and the layers bake separately.
If British baking-tin sizes have you reaching for a calculator, our guide to the Best Baking Tins for British Recipes explains common British sizes and their American equivalents.
Brit & Skillet tip: Check the depth of your pans as well as the diameter. Two pans can both be labeled 8 inches across while having very different capacities.
Victoria Sponge Ingredients
For the sponge:
- 1 cup (225g) unsalted butter, softened
- 1 cup + 2 tablespoons (225g) caster sugar or superfine sugar
- 4 large eggs, at room temperature
- 1¾ cups (225g) self-raising flour
- 2 teaspoons baking powder
- 2 tablespoons whole milk, plus a little more if needed
- 1 teaspoon vanilla extract
For the filling and top:
- ⅓ cup (about 110g) raspberry or strawberry jam
- Caster sugar, superfine sugar or powdered sugar, for dusting
A Note About Self-Raising Flour
British self-raising flour and American self-rising flour aren’t always formulated identically, so don’t assume they’re automatically interchangeable in every recipe.
If you have British-style self-raising flour, use the amount listed above.
If you’re working with American flour and would like to understand the difference before choosing a substitute, we’ve put together a full guide.
If self-raising flour is new to you, see our guide to Self-Raising Flour vs. Self-Rising Flour for the differences and practical options available to American bakers.
A Note About Caster Sugar
Caster sugar is a fine-grained sugar widely used in British baking. Its crystals are smaller than ordinary American granulated sugar, which helps it dissolve readily when creamed with butter.
In the United States, you may see a similar product labeled superfine sugar.
If you’d like to understand the difference before baking, our guide to Caster Sugar vs. Granulated Sugar explains what American bakers can use.
Brit & Skillet tip: Don’t confuse caster sugar with powdered or confectioners’ sugar. They’re completely different products.
How to Make a Classic Victoria Sponge
1. Prepare the Oven and Pans
Preheat the oven to 350°F (180°C / 160°C fan).
Lightly grease two 8-inch round cake pans.
Line the bottoms with rounds of parchment paper, then lightly grease the parchment if desired.
2. Cream the Butter and Sugar
Place the softened butter and caster or superfine sugar in a large mixing bowl.
Using an electric hand mixer, beat them together until the mixture becomes noticeably lighter in color and fluffy.
This step incorporates air into the mixture and helps create the characteristic light texture of the sponge.
Brit & Skillet tip: Properly softened butter matters here. It should yield when gently pressed but shouldn’t be melted or greasy.
3. Add the Eggs
Beat the eggs together lightly in a separate bowl.
Add them to the butter mixture gradually, beating well between additions.
Adding the eggs slowly helps the mixture stay emulsified rather than separating.
If the mixture begins to look curdled, add a spoonful of the measured flour and continue mixing gently.
4. Add the Flour
Sift the self-raising flour and baking powder over the mixture.
Using a large spoon or spatula, fold the dry ingredients in gently rather than beating vigorously.
Add the vanilla.
Fold in about 2 tablespoons of milk, using a little more only if necessary to achieve a soft batter that drops easily from the spoon.
Brit & Skillet tip: Once the flour goes in, treat the batter gently. Vigorous mixing at this stage can work against the light texture we’re trying to create.
Why Weighing the Ingredients Helps
Victoria sponge is an excellent example of why British bakers rely so heavily on kitchen scales.
Flour in particular can vary considerably when measured by volume depending on how it’s scooped into the cup. Measuring by weight removes much of that variation.
That’s why the gram measurements above are the preferred measurements for this recipe, with US volume measurements included for convenience.
If you’re beginning to bake more British recipes, our guide to the Best Kitchen Scales for British Recipes explains what American bakers should look for in a useful baking scale.
5. Divide the Batter
Divide the batter as evenly as possible between the two prepared pans.
For the most evenly matched layers, you can weigh the filled pans as you divide the mixture.
Gently smooth the tops.
6. Bake
Bake for approximately 20–25 minutes, or until the cakes are golden, have begun to pull very slightly from the sides of the pans, and spring back when gently touched in the center.
A toothpick or cake tester inserted into the center should come out clean or with only a few dry crumbs.
Avoid opening the oven unnecessarily during the early part of baking.
7. Cool the Cakes
Let the cakes cool in their pans for about 5–10 minutes.
Carefully turn them onto a wire rack, remove the parchment and allow them to cool completely.
Don’t assemble the cake while the layers are still warm or the jam may soften and run.
8. Fill the Victoria Sponge
Place one sponge layer on a serving plate with its flattest side facing upward.
Spread the jam evenly over the cake, leaving a small margin around the edge.
Place the second sponge on top.
Don’t press down heavily—the weight of the top layer will settle the cake naturally.
9. Finish the Cake
Lightly dust the top with caster sugar, superfine sugar or powdered sugar.
That’s it.
A Victoria sponge doesn’t need elaborate frosting or decoration to look inviting.
Sometimes the simple cakes are the ones that disappear first.
Jam, Cream or Buttercream?
One of the surprisingly serious questions surrounding Victoria sponge is what belongs in the middle.
Jam is the essential starting point.
Raspberry jam is particularly traditional, although strawberry jam is also extremely popular.
You will also encounter Victoria sponges filled with buttercream, whipped cream or a combination of cream and jam.
For a simple everyday Brit & Skillet version, jam alone is an excellent place to start.
If you add fresh whipped cream, remember that the finished cake will need refrigeration and won’t keep in quite the same way as a jam-only sponge.
Brit & Skillet tip: Whichever jam you choose, use one you genuinely enjoy eating. With such a simple cake, the flavor of the filling has nowhere to hide.
Why Did My Victoria Sponge Sink?
A slight settling isn’t necessarily a disaster, but a dramatically sunken sponge can have several causes.
The Oven Door Was Opened Too Soon
Opening the oven before the cake’s structure has set can cause it to collapse.
Try to leave the door closed during the early part of baking.
Too Much Raising Agent
More baking powder doesn’t necessarily produce a taller cake.
Too much can cause a cake to rise rapidly and then collapse.
The Batter Was Overmixed
Once the flour has been added, fold gently and stop when everything is combined.
The Cake Wasn’t Fully Baked
A cake can look finished on the outside while still being underbaked in the center.
Check that the middle springs back gently and use a cake tester or toothpick if you’re unsure.
Why Is My Victoria Sponge Dense?
A dense sponge can result from several things.
The butter may not have been soft enough to cream properly, the butter and sugar may not have been beaten sufficiently, or too much air may have been knocked out when the flour was added.
Ingredient measurement can also matter.
If British measurements regularly cause confusion, our guide to Converting British Baking Measurements for American Recipes will help you translate weights, temperatures and other common recipe measurements.
Brit & Skillet tip: Don’t chase perfection so hard that you forget you’re making cake. A slightly uneven homemade Victoria sponge served with tea is still a considerably better afternoon than one with no Victoria sponge at all.
Can You Make Victoria Sponge Ahead of Time?
Yes.
For the best texture, Victoria sponge is particularly lovely when eaten fresh, but a jam-filled cake can be made ahead and stored in an airtight container at room temperature for around 1–2 days, provided the filling doesn’t require refrigeration.
If you’ve filled the cake with whipped cream or another perishable filling, refrigerate it instead.
Bring a refrigerated sponge closer to room temperature before serving for a softer texture.
Can You Freeze Victoria Sponge?
The unfilled sponge layers can be frozen.
Once completely cool, wrap each layer securely to protect it from freezer burn and freeze.
For best quality, use within about 2–3 months.
Thaw the layers completely before adding the jam and assembling the cake.
Freezing the layers separately is generally more convenient than freezing the completed cake, particularly if you intend to use fresh cream.
How to Serve Victoria Sponge
Victoria sponge needs very little accompaniment.
Serve it in wedges with:
- A cup of hot tea
- Fresh strawberries or raspberries
- A small spoonful of whipped cream, if desired
- Or simply as it is
It’s equally at home at afternoon tea, on a celebration table or sitting under a cake dome waiting for somebody to decide that 3 p.m. is close enough to teatime.
Which, for the record, it usually is.
Victoria Sponge for an American Kitchen
British recipes can sometimes make Victoria sponge sound more complicated than it really is.
A 20cm sandwich tin becomes an 8-inch round cake pan. Caster sugar becomes superfine sugar. Self-raising flour simply requires a little understanding of the American alternatives.
The cake itself remains wonderfully straightforward: butter, sugar, eggs and flour transformed into two light sponge layers with jam between them.
And that’s exactly the sort of recipe Brit & Skillet is here for—classic British food translated for the American kitchen without taking away the things that made it British in the first place.
Brit & Skillet tip: Write down the exact pan size, ingredient brands and baking time that work in your oven. Those little notes are invaluable the next time you make the recipe—and they’re exactly the sort of details we’ll want when refining a recipe for repeat baking.
 Brit & Skillet